Discover the art of cutting cakes perfectly with essential tools and techniques. Learn how to achieve clean slices and professional results every time, making every celebration sweeter and stress-free.
Understanding the Importance of Proper Cake Cutting
Proper cake cutting ensures even portions, prevents crumbling, and maintains the cake’s visual appeal. Using the right tools, like a serrated knife and cake leveler, helps achieve clean slices. Even layers guarantee consistency, while brushing crumbs ensures a clean surface. For tiered cakes, stability is key to avoid collapse. Proper cutting enhances presentation, making every slice look professional. It also ensures fair portion distribution, making celebrations stress-free. By following these steps, you can achieve perfect results every time, whether for small gatherings or large events. Proper cake cutting is not just about serving; it’s about creating lasting impressions and enjoyable experiences for everyone.
Essential Tools for Cutting a Cake
A serrated knife ensures clean cuts, while a cake leveler creates even layers. A turntable provides easy access, and a serving spatula helps portion slices neatly and efficiently.
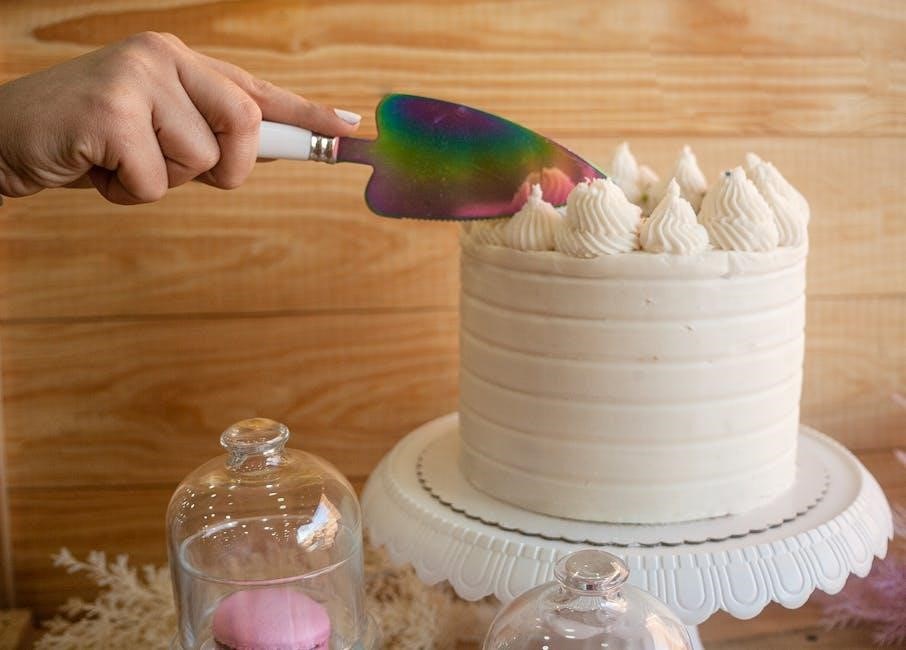
Using a Serrated Knife for Clean Slices
A serrated knife is indispensable for achieving clean, even slices. Its toothed edge effortlessly cuts through cake layers without tearing or crumbling. To use it effectively, ensure the blade is long enough to slice through the entire cake in one smooth motion. Start by cutting the cake down the middle, then make parallel cuts for uniform portions. For layered cakes, gently saw through each layer without applying too much pressure. Brushing crumbs off the knife between cuts prevents transferring them to other slices. For large cakes, consider the grid method: make vertical and horizontal cuts to create thin, rectangular slices. This technique is especially useful for cakes over six inches in size. Always use a sharp knife, as a dull one can tear the cake. Refrigerating the cake for 10 minutes before slicing can also help firm it up for cleaner cuts. These techniques ensure every slice is perfect and professional-looking.
The Role of a Cake Leveler
A cake leveler is a crucial tool for ensuring even layers when cutting and serving cakes. It helps create a stable base, making the cake easier to frost and slice. By trimming the mounded portion of the cake, the leveler allows the layers to fit together seamlessly. This is especially important for tiered cakes, where an uneven base can lead to structural issues. Using a leveler also ensures that each slice is consistent in size and appearance, enhancing the overall presentation. For round cakes, leveling ensures the knife glides smoothly through all layers in one cut. Additionally, leveling prevents the cake from shifting during cutting, reducing crumbs and mess. Whether you’re working with round, square, or irregularly shaped cakes, a leveler is essential for professional-looking results and even portion control. It simplifies the cutting process, making it faster and more efficient for both home bakers and professionals alike.
Preparing the Cake for Cutting
Ensure the cake is stable and even by trimming excess and brushing away crumbs. This step guarantees clean slices and a polished presentation for any celebration or event.
Trimming the Cake for Even Layers
Trimming is essential for ensuring even layers and a stable cake. Start by placing the cake on a flat surface or turntable. Use a serrated knife or cake leveler to slice off any uneven portions, especially domes or excess frosting. For multi-layer cakes, carefully trim each layer individually before stacking. This step prevents the cake from toppling and ensures clean, even slices. If using a knife, make sure it’s long enough to cut through all layers in one smooth motion. Once trimmed, turn the cake over and gently brush away crumbs for a clean surface. Evenly trimmed layers not only look professional but also make the cake easier to cut and serve. This preparation ensures every slice is consistent and visually appealing, making your celebration even more special.

Brushing Crumbs for a Clean Surface
Brushing crumbs is a crucial step to ensure a clean and professional finish. After trimming, use a small, soft-bristled brush or a clean spatula to gently sweep away loose crumbs from the cake’s surface. This prevents crumbs from embedding in the frosting or causing unevenness. For tiered cakes, brush each layer individually before stacking to maintain a polished look. If using a turntable, rotate the cake slowly to access all areas. Lightly brush from the top downward, working in one direction to avoid spreading crumbs. For stubborn crumbs, dampen the brush slightly, but avoid over-moistening to prevent damaging the cake. This step ensures a smooth, even surface for frosting and decorating, making the cake more visually appealing and easier to slice cleanly. A crumb-free surface also enhances the overall presentation, creating a professional finish for any celebration.
Techniques for Cutting Different Cake Shapes
Master cutting techniques for round, square, and irregularly shaped cakes. Use serrated knives for clean slices and grid patterns for larger cakes to ensure even portions and professional results.
How to Cut a Round Cake
To cut a round cake effectively, start by placing it on a stable surface and using a long, sharp serrated knife. Begin by cutting down the middle to ensure even division. For uniform slices, use a gentle sawing motion and consider marking the cake with equally spaced lines before cutting. Remove each slice as you go to maintain stability. For larger cakes, a grid pattern can help achieve consistent portions. When dealing with multi-layered cakes, cut through all layers at once with a sufficiently sharp and long knife. Be mindful of decorations and use a hot knife to prevent smearing frosting. Adjust your technique based on the cake’s texture, and clean the knife between cuts for precise, clean slices. This method ensures each slice is both visually appealing and enjoyable to eat.
Guidelines for Cutting Square or Rectangular Cakes
For square or rectangular cakes, begin by cutting the cake into equal-sized portions using a sharp serrated knife. Start by cutting the cake down the middle lengthwise and then crosswise to divide it into four equal sections. For larger cakes, use a grid pattern to ensure consistent slices. Hold the knife at a slight angle and apply gentle pressure to avoid crumbling. If the cake has multiple layers, cut through all layers at once with a long, sharp knife. For precision, mark the cake with equally spaced lines before cutting. To achieve uniform slices, use a ruler or cake cutter guide. Remove each slice carefully to prevent breaking, especially for layered cakes. Clean the knife between cuts to maintain cleanliness and precision. This method ensures even portion sizes and a professional finish for any square or rectangular cake.
Methods for Cutting Irregularly Shaped Cakes
Cutting irregularly shaped cakes requires a strategic approach to ensure even portions and minimal waste. Begin by visualizing the cake’s natural divisions or symmetry. Use a sharp serrated knife to make clean cuts, starting from the top and working downward in smooth, steady motions. For asymmetrical shapes, mark the cake with toothpicks or a knife tip to guide your cuts. Cut in a radial pattern from a central point for cakes with circular elements, or follow the natural contours for unique shapes. For intricate designs, consider slicing smaller sections first, then combining them into larger portions. Always maintain gentle pressure to avoid breaking the cake. Clean the knife frequently to prevent crumbs from transferring between slices. This method ensures that every piece, no matter the shape, is served neatly and evenly, preserving the cake’s artistic appeal while delivering perfect portions.
Tiered cakes require careful handling to maintain stability while cutting. Use a serrated knife to slice through each tier separately, starting from the bottom. Ensure even portion control by aligning cuts across tiers for uniformity, preventing the cake from collapsing. Stacking and serving each tier individually can simplify the process, ensuring a clean and professional presentation at events. This method guarantees that each guest receives an equal and visually appealing portion, making tiered cakes a stunning yet manageable centerpiece for any celebration. Always clean the knife between cuts to avoid cross-contamination of flavors or crumbs, enhancing the overall experience. Proper tools like cake stands or levelers are essential for stability, while pre-marking portion lines can guide precise cuts, ensuring every slice is perfect. Attention to detail ensures tiered cakes remain both beautiful and delicious, impressing your guests with both appearance and taste. Portion control ensures every guest receives an equal and satisfying slice of cake. For round cakes, start by cutting a diameter line, then make parallel slices 2 inches apart. For square or rectangular cakes, divide the cake into equal-sized rectangles or squares. Use a serrated knife to cut cleanly through layers, and remove each slice as you go to maintain stability. For tiered cakes, cut one tier at a time, starting from the bottom, to prevent structural collapse. Use a cake stand to elevate and stabilize the cake while cutting. To determine serving sizes, consider the cake’s size and the number of guests. Larger cakes (over 6 inches) should be cut into thin rectangles rather than wedges for uniformity. Marking portion lines beforehand can help guide precise cuts, ensuring consistency. Proper portion control not only enhances presentation but also ensures everyone enjoys a fair share of the celebration. Clean cuts and even slices make the experience memorable and stress-free. Mastering the art of cake cutting transforms any celebration into a seamless experience, ensuring every guest enjoys a perfect slice. By using the right tools, like serrated knives and cake levelers, and applying techniques tailored to different cake shapes, you can achieve professional results. Proper preparation, such as trimming layers and brushing away crumbs, enhances both presentation and taste. For tiered cakes, portion control and careful slicing prevent structural issues. Whether it’s a round, square, or irregularly shaped cake, following these guidelines ensures clean, even slices. Don’t forget to use printable guides or grid patterns for larger cakes to maximize portions. With practice, you’ll confidently cut cakes like a pro, making every occasion memorable and stress-free. Remember, precise cuts and equal portions create lasting impressions, making your celebrations sweeter and more enjoyable for everyone. Happy baking and serving!
Special Considerations for Tiered Cakes
Portion Control and Serving Sizes