Kung Fu Tea offers a variety of teas, from classic brews to milk and fruit options, each with unique nutritional profiles detailed in their PDF guide.
1.1 Overview of Kung Fu Tea and Its Popularity
Kung Fu Tea is a global brand renowned for its diverse range of tea drinks, blending traditional recipes with modern flavors. Its popularity stems from unique brewing techniques, customizable options, and a focus on quality ingredients. The brand’s nutrition guide, available as a PDF, has further enhanced its appeal by providing transparency about calorie, sugar, and nutrient content, helping customers make informed choices.
1.2 Importance of Nutrition in Kung Fu Tea Products
Nutrition plays a crucial role in Kung Fu Tea’s product offerings, as consumers increasingly prioritize health. The brand emphasizes transparency by providing detailed nutritional information, including calorie counts, sugar levels, and ingredient lists. This focus on nutrition helps customers align their choices with dietary needs, making Kung Fu Tea a preferred option for health-conscious individuals seeking delicious yet mindful beverages.
Classic Kung Fu Tea Series
Kung Fu Tea’s Classic Series features traditional black, green, and oolong teas, offering customizable sugar, ice, and tea levels to suit every taste preference.
2.1 Black, Green, and Oolong Teas: Nutritional Breakdown
Kung Fu Tea’s black, green, and oolong teas are rich in antioxidants and low in calories. Black teas offer robust flavors with minimal calories, while green teas provide higher catechin content. Oolong teas, partially fermented, balance smoothness and nutrition. Each variety’s nutritional profile is detailed in the Kung Fu Tea PDF guide, helping customers make informed choices.
2.2 Sugar, Ice, and Tea Levels: Impact on Nutrition
Sugar, ice, and tea levels significantly affect the nutritional profile of Kung Fu Tea drinks. Lower sugar and no ice reduce calorie and sugar content. Tea levels impact antioxidant intake, with higher levels boosting nutrients. The PDF guide provides detailed calorie ranges, from 60 to 250 calories per drink, depending on size and customization, helping consumers tailor their choices for healthier options.
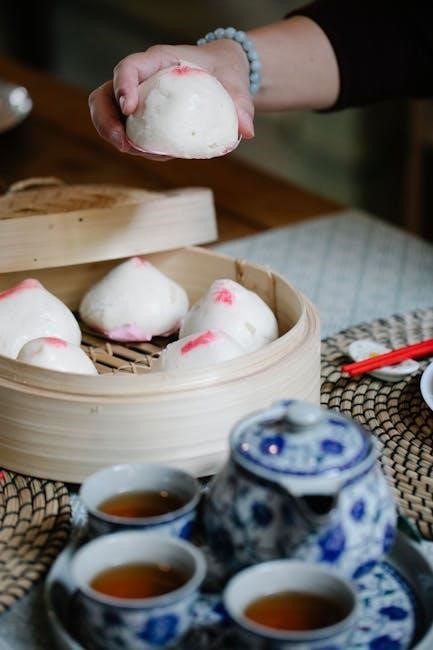
Milk Tea and Toppings
Milk tea and toppings add richness to Kung Fu Tea drinks, offering a variety of flavors and textures. The nutrition guide details their caloric and sugar impact, helping fans make informed choices while enjoying their favorites.
3.1 Nutrition Facts for Milk Tea Varieties
Milk tea varieties at Kung Fu Tea range in calories, sugar, and fat content. A medium-sized milk tea typically contains around 200-300 calories, with variations depending on size and toppings. The nutrition guide provides detailed breakdowns, including sodium and protein levels, helping customers understand the dietary impact of their favorite milk tea drinks.
3.2 Popular Toppings: Their Caloric and Sugar Contribution
Popular toppings like boba, jelly, and pudding significantly increase calorie and sugar content in Kung Fu Tea drinks. For instance, boba adds approximately 100 calories and 20 grams of sugar per serving. The nutrition guide details these contributions, enabling customers to make informed choices based on their dietary preferences and restrictions.
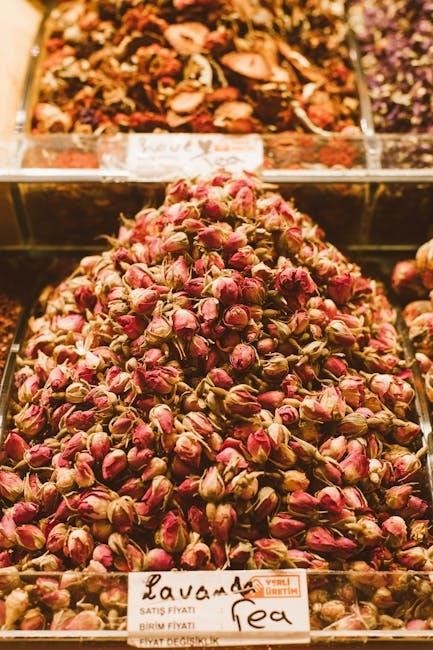
Fruit and Herbal Teas
Fruit and herbal teas at Kung Fu Tea offer refreshing, low-calorie options. Varieties like honey, winter melon, and longan jujube provide antioxidants. These teas are naturally caffeine-free and rich in flavor, making them a healthy choice. The nutrition guide details their benefits.
4.1 Honey, Winter Melon, and Longan Jujube Teas: Nutritional Profile
Kung Fu Tea’s honey, winter melon, and longan jujube teas offer distinct nutritional benefits. Honey tea provides antioxidants and natural sugars, while winter melon tea is low in calories and rich in vitamins. Longan jujube tea contains vitamins A and C, potassium, and fiber, supporting immune function and digestion. These teas are naturally caffeine-free and rich in flavor, making them a healthy choice for those seeking a refreshing, low-calorie beverage option.
4.2 Syrups and Honey Water: Impact on Calorie and Sugar Content
Syrups and honey water significantly increase calorie and sugar content in Kung Fu Tea drinks. A medium-sized drink with syrup can add up to 60-80 calories and 15-20 grams of sugar. Honey water contributes natural sweetness but also raises sugar levels. Customizing syrup and honey levels helps balance taste and nutritional intake, making it easier to align with dietary preferences and health goals.
Allergens and Special Diets
Kung Fu Tea products may contain allergens like milk and soy. Vegetarian options are available, and keto-friendly choices can be customized by modifying toppings and sweeteners.
5.1 Common Allergens in Kung Fu Tea Products
Kung Fu Tea products may contain common allergens such as milk, soy, and gluten. Milk is present in dairy-based toppings, while soy can be found in certain syrups or flavorings. Gluten is generally absent but cross-contamination risks exist. The nutrition guide provides detailed allergen information to help customers make informed choices.
5.2 Vegetarian and Keto-Friendly Options
Kung Fu Tea offers vegetarian options by substituting dairy with plant-based alternatives. Keto-friendly choices include low-carb teas with minimal sugar and no toppings. Opting for less sugar or sugar-free syrups further reduces carbs. Customers can customize drinks to suit dietary preferences, ensuring both taste and nutritional alignment with vegetarian or keto lifestyles.
Kung Fu Tea Nutrition Guide
The Kung Fu Tea Nutrition Guide provides detailed nutrition facts, helping customers make informed choices. Available as a downloadable PDF, it includes calorie counts and ingredients.
6.1 Features of the Kung Fu Tea Nutrition PDF
The Kung Fu Tea Nutrition PDF is a comprehensive guide detailing calorie counts, macronutrients, and allergen information for all menu items. It also outlines sugar levels, tea sizes, and toppings, enabling customers to customize their drinks according to dietary preferences. Regularly updated, the guide ensures transparency, helping patrons make informed decisions about their Kung Fu Tea choices.
6.2 How to Download and Use the Nutrition Guide
The Kung Fu Tea Nutrition PDF is available for download on their official website. It provides detailed nutrition facts, including calories, sugars, and allergens. Users can filter by drink size and customize options like sugar levels and toppings. The guide is updated regularly, ensuring accurate information. Download, save, and reference it easily to make informed choices for a healthier Kung Fu Tea experience.
Calorie and Sugar Content
Kung Fu Tea’s nutrition guide provides detailed calorie and sugar content for each drink, helping customers make informed choices aligned with their dietary goals.
7.1 Calorie Information for Different Drink Sizes
Kung Fu Tea provides detailed calorie information for various drink sizes, ranging from medium to extra-large. A medium-sized classic tea typically contains around 120-140 calories, while larger sizes can reach up to 200-250 calories. Milk teas and flavored options generally have higher calorie counts due to added ingredients like milk, sugar, and toppings, with large sizes often exceeding 300 calories. This guide helps customers choose sizes that fit their dietary needs by offering clear nutritional comparisons across different options.
7.2 Sugar Levels in Kung Fu Tea Products
Kung Fu Tea products vary in sugar content, with classic teas generally containing 25-35 grams of sugar per medium size. Milk teas and flavored options often range from 40-60 grams due to added ingredients. The nutrition guide provides detailed sugar levels for each drink size, helping customers monitor their intake and make informed choices aligned with their dietary preferences and health goals.
Ingredients and Additives
Kung Fu Tea uses natural ingredients like tea leaves, milk, and fruit, with some additives to enhance flavor and texture, as detailed in their nutrition guide.
8.1 Detailed List of Ingredients in Kung Fu Tea Drinks
Kung Fu Tea drinks feature ingredients like black, green, and oolong teas, milk, sugar, and fruit syrups. Some options include natural flavors and toppings, with detailed lists provided in their nutrition guide for transparency.
8.2 Artificial Additives and Their Impact on Nutrition
Kung Fu Tea’s nutrition guide reveals that some drinks contain artificial additives, such as flavor enhancers and preservatives, which can increase calorie and sugar content. These additives may affect the overall nutritional value, making certain beverages less suitable for health-conscious consumers seeking natural ingredients.
Sodium and Health Considerations
Kung Fu Tea’s nutrition guide highlights varying sodium levels in their products, which may impact blood pressure and cardiovascular health for some consumers.
9.1 Sodium Content in Kung Fu Tea Products
Kung Fu Tea’s nutrition guide reveals varying sodium levels across its products. Classic teas generally contain less sodium, while milk teas and flavored options may have higher amounts due to added ingredients. The guide provides specific sodium content for different drink sizes, helping consumers make informed choices aligned with their dietary needs and preferences.
9.2 Health Implications of High Sodium Intake
Excessive sodium consumption can lead to health concerns such as high blood pressure, heart disease, and stroke. It may also cause fluid retention and strain kidney function. Moderating sodium intake is crucial for maintaining overall health, especially for those with pre-existing conditions. Kung Fu Tea’s nutrition guide helps consumers monitor their sodium intake through detailed nutritional information.
Health Benefits of Kung Fu Tea
Kung Fu Tea offers antioxidant-rich options like green and oolong teas, which may promote heart health and aid in weight management, supporting overall wellness naturally.
10.1 Antioxidants and Other Health-Promoting Compounds
Kung Fu Tea’s nutrition guide highlights the presence of antioxidants like polyphenols and catechins, particularly in green and oolong teas. These compounds are known to combat free radicals, potentially reducing inflammation and improving cardiovascular health. Additionally, certain teas contain vitamins and minerals that support immune function and overall well-being, making them a nutritious choice for health-conscious consumers.
10.2 Potential Weight Management Benefits
Kung Fu Tea’s herbal and green tea varieties may support metabolism and fat burning, aiding in weight management. Some teas naturally suppress appetite, helping reduce calorie intake. The nutrition guide provides detailed calorie and sugar content, enabling customers to make informed choices that align with their weight goals, promoting a balanced diet and healthy lifestyle.
Comparison with Competitors
Kung Fu Tea stands out for its transparent nutrition guide and customizable options, offering a competitive edge in calorie and sugar content compared to other brands.
11;1 Nutritional Comparison with Other Tea Brands
Kung Fu Tea distinguishes itself with a detailed nutrition guide, offering transparency on calories, sugars, and fats. Compared to competitors, it provides customizable options to suit dietary preferences, ensuring lower calorie and sugar content in many drinks. This approach appeals to health-conscious consumers seeking balanced choices without compromising flavor, setting it apart in the market.
11.2 Unique Selling Points of Kung Fu Tea Nutrition
Kung Fu Tea’s nutrition guide emphasizes customizable options, allowing customers to tailor sugar levels and calorie intake. Its transparent approach to listing ingredients and nutritional facts sets it apart. The brand also offers keto-friendly and vegetarian choices, appealing to diverse dietary needs. This focus on personalization and clarity makes Kung Fu Tea a leader in providing mindful, health-conscious beverage options.
- Customizable sugar levels and calorie adjustment.
- Transparent nutrition facts and ingredient lists.
- Keto-friendly and vegetarian options available.
Kung Fu Tea’s nutrition guide provides clear insights into calorie counts, sugar levels, and health benefits, empowering customers to make informed choices for a mindful tea experience.
- Customizable options for health-conscious drinkers.
- Transparent nutrition facts for every product.
12.1 Summary of Key Nutritional Insights
Kung Fu Tea’s nutrition guide reveals a range of options, from low-calorie classic teas to richer milk and fruit-based varieties. Calorie counts vary significantly by size and toppings, with detailed breakdowns of sugar, fat, and sodium levels. Antioxidant-rich teas offer health benefits, while customizable options allow consumers to tailor drinks to dietary preferences, making informed choices easier for health-conscious enthusiasts.
12.2 Final Thoughts on Making Informed Choices
Kung Fu Tea’s detailed nutrition guide empowers consumers to make informed decisions by providing clear calorie, sugar, and ingredient information. By understanding the nutritional content, fans can balance their preferences with health goals, opting for lower-sugar or non-dairy options when needed. This transparency ensures that every sip aligns with personal wellness priorities, making Kung Fu Tea a thoughtful choice for health-conscious enthusiasts.